


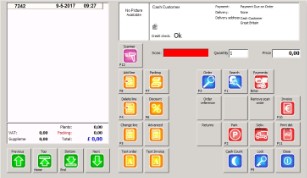
For a quick processing of sales without errors via the WinTree Cash & Carry program, there can be made use of scanners. The products are provided with a label with a barcode or there is made use of the barcode that is present on the packaging of the product. With help of a barcode scanner, these codes can be read so the correct product in the Cash & Carry system can be selected, stock can be updated accordingly and the invoice can be made for the customer.
for scanning of barcodes, three types of scanners can be used:
- Keyboard scanner
- Keyboard scanner with Bluetooth
- Batch scanner
Keyboard scanner
This scanner is with a cable, max of approx. 2 meters, connected with the computer on which the Cash & Carry program is active. The scanner must be set in such a way that both EAN- as well as Interleave 2of5 barcodes can be scanned. Then the scanner must be set up that after scanning of a barcode a TAB is entered.
Please read the manual of the keyboard scanner for setting up the scanner.
If a keyboard scanner is used, then for scanning the focus of the Windows cursor always needs to be on the scan field of the Cash & Carry program. This is visible when the scan field is coloured green.


Keyboardscanner with Bluetooth
This keyboard scanner functions similar to the keyboard scanner with a cable, with the difference that this scanner has no cable. The scanner is connected to the computer via Bluetooth.
The big advantage of this scanner compared to the version with cable is the flexibility provided to the user. There is no longer a limitation by the length of the cable, allowing to walk further away from the computer. The range of a keyboard scanner with Bluetooth is strongly dependent of the type of scanner and the amount of obstacles between keyboard and receiving computer.
Batch scanner
The third type of scanner is a so-called batch scanner. A batch scanner is a scanner that during the use has no connection to a computer or loading station. The user can walk freely with the scanner over the Cash & Carry. The sold products are scanned with the required amounts. All scanned products are saved in the scanner. The only information the scanner saves, is the amount and the scanned barcode. More information about the scanned product such as product names or prices are not saved in the scanner and thus will also not be visible on the scanner.
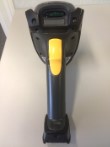
After everything is scanned for a customer, the scanner is placed in the cradle (=loading station), then the scanned lines are sent to the computer. This scan file is then available for WinTree Cash & Carry.
With help of  this scan file is imported into the Cash & Carry program and the scanned products, with name and prices, are visible in the window. These lines can then be further processed with the available functions.
To correctly save the scanned products in the batch scanner (batch file must be readable for WinTree), there has to be software installed on the scanner by TSD. This software is especially developed to provide the scanned lines with the correct format. It is not possible to do this with the default scan program provided with the scanner.
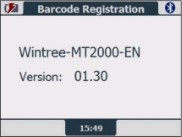
TSD supports exclusively scan software developed by TSD for the Motorola MT2070. Please always contact TSD before the purchase of a batch scanner.
 Motorola MT2070 batch scanner
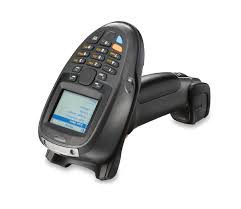
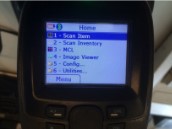
The MT2070 scanner is delivered with a default operating system. The separate WinTree scanner software is installed by TSD. If the scanner is fully charged then the default operating system will be started up and the homepage is shown on the scanner.
General functioning scanner
The scanner on the front a display and a keyboard.
Navigate through the shown menu with help of the big button between <<Alt>> and <<Ctrl>>. The menu can also be opened with help of the number on the keyboard. For example to open menu 3-MCL, type <<3>>.
At the bottom of the display, it is also possible that options are shown. These options can be selected by clicking on the button directly below the option. In the picture above the option Menu can be chosen by clicking on <<Alt>>.
The enter button is <<Ent>>.
Use <<Esc>> to go back to the previous menu.
On the back of the scanner there is a yellow trigger. This trigger is used to make the display readable again (reason being that the window after 30 seconds of inactivity will turn to black to save energy) and to scan barcodes. This last function only works when the WinTree scanner program is started up.
The battery can also be removed on the backside.
Also read the manual of the scanner itself for more information about the general functioning of this scanner.
Starting up the WinTree scan program
Option 3 – MCL is the WinTree scan program. This program is started up on the scanner by going to this option with help of the arrow-buttons and then clicking on [Enter].
Use WinTree scan program
The option 3 – MCL will start up the WinTree scan program.
After the program is started up, the main menu of the program will be shown.
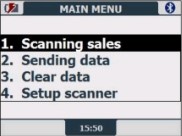
This menu is used to scan the products of the customer. Open this menu by clicking on <<Ent>> or <<1>> on the keyboard of the scanner.
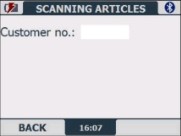
The first window of the 'Scanning articles'-menu is opened.
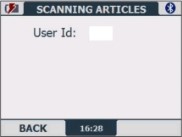
Always enter '1' as the User ID (by clicking on <<1>> on the keyboard). This number is not used in the processing of the scanned lines in WinTree Cash & Carry.
Click on <<Ent>> to continue.
Always enter '1' as the User ID (by clicking on <<1>> on the keyboard). This number is not used in the processing of the scanned lines in WinTree Cash & Carry.
Only if the WinTree Cash & Carry program makes use of day numbers, then at the customer number the day number of the customer is entered. Please contact TSD if wanting to make use this. This manual assumes that 1 scan is made per customer and that the scanned lines are first processed in WinTree Cash & Carry before a new customer is scanned
Click on <<Ent>> to continue.
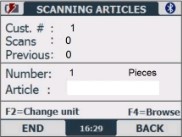
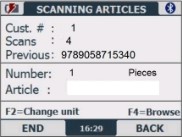
Note: the word Pieces behind the field 'Amount' is determined on the basis of the default set scan unit (see Setup scanner further on in this manual).
Now there can be started with scanning. Aim the scanner at the barcode and press the trigger. A red bar will be visible. Manage that the entire barcode is 'caught' by the red bar. The scanner will give a beep when the barcode is caught.
In the window the amount of scans (in the upper part of the window) is increased. There can directly be continued with scanning the next barcode.
Amount of sold products
A scanned barcode means the sale of 1 product. When the customer buys 2 pieces of the same product then the barcode can simply be scanned twice. But it is also possible to first enter the amount with help of the keyboard. The entered numbers are shown in the field 'Article' in the window. Click on <<Ent>> when the amount is entered. The entered amount is now shown behind the word 'Amount'. Then scan the barcode once. The scanner will now combine the entered amount and the scanned barcode.
NOTE: the maximum amount that can be entered is 9999. 10000 or more can not be saved as an amount by the scanner.
After a barcode is scanned, the last barcodenumber is shown in the field 'Previous'. The total amount of scanned products is shown in the field 'Scans'.
Read the chapter 'More options during scanning sales' on what more can be done with the scanned lines.
After all products for the customer are scanned, the scanned lines has to be sent, as a file, to the computer with the WinTree Cash & Carry program. With this the cradle of the scanner is used.
Sending data from the scanner to the computer is done via the main menu with option 2. 'Sending data'. After scanning the last barcode there has to be gone back to the main menu. Click twice on <<Alt>> for this.
The main menu will be opened.
From the main menu, the scanned lines are sent as a file to the computer with option 2. 'Sending data'. This scan file can then be further processed in the Cash & Carry program. Place the scanner in the cradle before option 2 is chosen. Click on <<2>>. If there is a good connection between the scanner-cradle and the computer then almost directly the next window will be shown.
See also the description in the chapter MCL LinkLite.
If the scan file is correctly process in WinTree Cash & Carry program, then click on <<Ctrl>>. The scanned lines are cleared from the scanner.
NOTE: When clicking on <<Alt>> then the scanned lines are not cleared. If then, for example for a new customer, products are scanned then the old, not cleared lines are added to this scan file. When processing this new scan file, the old and new scan lines are displayed in Cash & Carry.
After clicking on <<Ctrl>> or <<Alt>>, the main menu will be opened again. And with option 1. 'Scanning sales' the products for the next customer can be scanned. If it is unknown if the data is cleared, then choose in the main menu the option 3. 'Clear data'.
Use this option to clear all scanned lines saved in the scanner. Click on <<3>> and confirm the clearing by clicking on <<Ctrl>>.
 More options during scanning sales
During the scanning of sold products there is an amount of possibilities to view or alter scanned lines.
F2= Change unit
On the basis of the settings (see chapter Setup scanner) there is scanned with a certain unit. By default Pieces will be used. This means that in the scan file that per line as unit P is saved.
It is also possible to temporarily convert the unit 'Pieces' to 'Boxes'. then first press the blue button on the keyboard. The time in the display will be replaced by a blue dot. Then click on <<2>>. The word Pieces will be changed into Boxes. Then scan the products as usual. If the scan file is now sent to the Cash & Carry program then the B in the scan file will be used by WinTree to convert the bundle size to the correct amount sold.
Example:
Bundle size of a product, saved in the stock items of the product in WinTree, is 24.
During the scanning, the unit is converted to Boxes. The scanned amount is 2. During the import of the scan file the amount 2 is converted to 2 * 24 = 48 sold plants.
NOTE: when the unit has been temporarily converted in the scanner then all lines that will follow, after converting, will get the unit Box. As soon as this unit is converted back, the unit Pieces is used again. The changed unit is not set back if a scan file is sent and cleared on the scanner.
F4=Browse
With this function, the scanned lines can be viewed and if needed can be altered. Click also for this option first on the blue button, the time in the display will be replaced by a blue dot. Then click on <<4>>. The window below will be shown on the display.
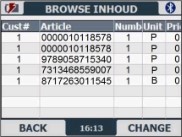
Every scanned line is shown in the window. In case, as for the first two lines, two times the same barcode is scanned then this will be shown as two lines in the list. Only when importing these lines into Cash & Carry program, these lines will be summed up.
Now select with the big button on the keyboard (between <<Alt>> and <<Ctrl>>) the line that has to be altered and click on <<Ctrl>>.
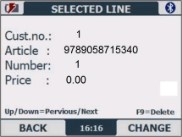
The details of the selected line will be shown. The focus lays on the white field in the bottom roght corner. Here flickers a cursor.
Click on <<Ctrl>> to alter the amount in the selected line.
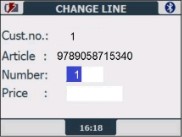
The scanned amount can now be altered. Use for this the buttons on the keyboard. Click on <<Ent>> to save it. The focus then jumps to the field 'Price'.
NOTE: It has no purpose to enter a price here because the price will not be used when importing the file into the Cash & Carry program.
Click on <<Ent>> again and then on <<Alt>> to go back to the list with scanned lines. The altered amount is also visible here.
Next to altering scanned amounts also a line can de deleted in its entirety. Select for this the line to be deleted in the list. The details of the line are shown. Click on the blue button and then on <<9>>. The window 'Delete' will be opened where the focus (flickering cursor) lays on the field 'Delete?'.
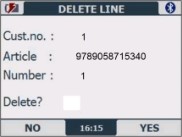
Press <<Ctrl>> to confirm deleting the line. Press <<Alt>> if the line does not have to be deleted. After clicking on one of the buttons, the list with scanned articles will be directly shown again.
This option gives access to settings that are used by the scan program, and are set by TSD on the scanner.
There are two settings that, after the battery of the scanner has run out of charges, have to be changed to be able to scan correctly. These are 'Scan units' and 'Check pos'.
Open from the main menu of WinTree scan program option 4. 'Setup scanner'.
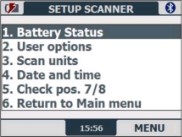
Scan units
Choose option 3. 'Scan units'.
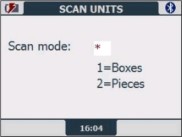
After a restart of the scanner, the default scan unit will be on Boxes. Insert the number 2 to select the scan unit Pieces. Click on <<Ent>> to save the setting. The settings menu is opened again. Choose option 6. 'Return to Main menu' to go back. Or choose option 5. 'Check pos 7/8' to alter the scan mode.
Scan mode
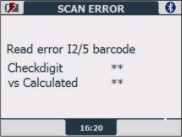
If during the scanning of Interleave 2of5 barcodes (batchbarcodes, 8 digits) the following warning is shown, the scan mode is set up wrong in the settings.
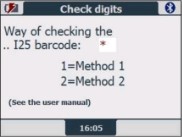
Open from the Setup scanner menu, option 5. 'Check pos 7/8'.
Change the shown number 2 in 1 and press <<Ent>>. The scan mode is altered. Go back to the main menu and there can be scanned again.
NOTE: Do not alter any of the other settings in the scan program unless discussed with TSD.
The important steps
From main menu to scanning lines:
<<Ent>>
-> <<1>> <<Ent>>
-> <<1>> <<Ent>>
-> scanning barcodes
Done with scanning and sending data to the computer
<<Alt>>
-> <<Alt>
-> <<2>>
-> <<Ent>>
Main menu is back on the window, ready for scanning next customer
MCLink Lite
The communication between the scanner and the computer on which WinTree Cash & Carry is used, is managed via the program MCL LinkLite. This program has to be installed on the computer that also has WinTree Cash & Carry. Without this program, the scan file cannot be sent to the computer and thus the scan file can also not be imported into WinTree Cash & Carry.
Please contact TSD for installing and setting up this program.
NOTE: The program must ALWAYS be started up before sending the scan file from the scanner! If the program is not started then when sending the scan file there will be an error message shown on the scanner.
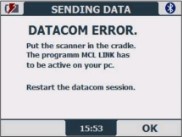
Start MCL LinkLite and send the file again from the scanner.